Quantcast
Channel: GavickPro Documentation » Customization Tips
Viewing all 41 articles
Browse latest View live

How to include a module inside Joomla 3.x article?

$
0
0

Joomla! since version 1.5 have feature, I mean plug-in, which allows you to add modules inside of the content area of articles. This plug-in (Content – Load Modules) exists in the default system and is enabled. Extension has its limitations, the Basic Options tab contains only one option, Style. The options in this combo box determine how the system handles the styling of the module position and it have several options. We suggest to use one of them: Wrapped by Divs and No wrapping (raw output).

How to add module:

Within content loads Module positions, Syntax: {loadposition user1}
or Modules by name, Syntax: {loadmodule mod_login}.

Because you can create by writing your own module position name,

adding-new-module-position-name

you can use it later with syntax inside Joomla! article content. Remember that module must be published and assigned to page/menu item where you need it or to all if you don’t know yet.

adding-new-module-position-name-2

Is there any alternative solution?

Yes, with Modules Anywhere (www.nonumber.nl) you can include a single module or complete module positions anywhere in your site, including within 3rd party components and even within other modules. Even with Free version you’ll be pleased.


How do I add the trademark symbol(s) to Joomla Title?

$
0
0

Sometimes the standard characters and numbers are just not enough. Especially if you need to add (C) copyright, (R) registered or (TM) trademark (also called trade mark) logo to Joomla title when your clients have a registered or trademarked company name. Adding this symbols in content is pretty simple but inside Joomla titles is not so easy, without hacking Joomla code. Because normally you have to disable cleaning title code from HTML tags.

But there is a safe & working solution. First, please download and install ReReplacer (nonumber.nl) or similar component from JED – which allow to search and replace any content present in a page.
Second, Create a new rule.

ReRelacer in action

ReRelacer in action (click to see big)

Use your (client) company name in Search field and insert:
COMPANY<sup><span>&#174;</span></sup>

in Replace field.

  • For TM symbol use: &#153;
  • For registered trademark symbol (R) use: &#174;
  • For copyright sign (C) use: &#169;
  • For service mark (SM) use: &#8480;

Then add following CSS style to reduce size of symbol. Of course you can also use pixels size instead:
h1 span {font-size:80%;}

Then you should get (R) or (SM) after title after enabling this rule:
COMPANY®
or
COMPANY

Legal information (United States):
Trademarks and copyrights protect different types of intellectual property. A trademark typically protects brand names and logos used on goods and services. A copyright protects an original artistic or literary work. However, use of the TM and SM symbols may be governed by different local, state, or foreign laws.

How to Add or Use Custom CSS in Template ?

$
0
0

Yes, you can customize Gavick Templates. There are few methods will allow you customize appearance of selected elements (like Header font size/color) or even the entire layout you are using.

First, you don’t have to edit the template.css or any other of the parent template (Gavern framework). The reason being that if you edit the framework files then when you update the template you will loose all of your code. Because all of your changes will then be overwritten by new version.

Second, our Gavern Framework (for Joomla 2.5 and Joomla 3.1) have options that will allows you use custom CSS code to override the default code. CSS (Cascading Style Sheets) is a kind of code that tells the browser how to render a web page appearance.
Go to Template Manager -> click on selected GK Template Name -> then choose Advanced settings tab.

custom_css_code

In Joomla 2.5 (Gavern Framework)

In Joomla 3.1

In Joomla 3.1 (Gavern Framework)

As you see on above screenshot Framework (Template) offers you:

  • CSS Overwrite – which allows you to enable & use additional CSS file with override rules – override.css. Placed here: templates\gk_TemplateName\css\override.css. When editing your CSS via CSS Editor, it is a very good idea to always preview your changes before actually applying them – regardless of your skill level.
  • Under Custom CSS code is where you will input any CSS you want to change on the page/element. You type it in just like you would in a .css file. Remember to Save your changes.

Which option is better and when to use it?
If you need few small changes in stylesheets use Custom CSS code field. If you need more changes use override.css file.

How to find which line I have to change/override?
Be sure to use the proper format and refer to existing selectors and classes.  Firebug tool will help you inspecting HTML elements and  CSS properties (see on youtube how it works). If you try to set a style rule for something that doesn’t exist in the template’s style, you will not see any changes.

How it works?
The reason we are able to add our own CSS and have it override the actual template’s CSS is because of one of the key factors of Cascading Style Sheets–the cascade. Your user inputed styles will take precedence over the template’s default styles. The styles you enter will be appended at the end. That’s why this will override any existing CSS properties that have been defined by the default stylesheet. This will also allow you to style elements that aren’t specifically styled by the template’s CSS.

How to add video inside Tabs GK5 ?

$
0
0

First of all you need video and its code – you can use almost any from youtube or similar web-service. Embedded videos can be played on any Web page or site that supports embedding content. Google will give you the code, and you just need to copy and paste. The first step is to click on “Share” and then on “Embed” to find the embed code,  as shown below.
video_youtube_code

Then in Tabs GK5 add new Tab and inert generated before code.

Video code from YouTube

Video code from YouTube

Video form YouTube but inserted using Allvideos plugin

Video form YouTube but inserted using Allvideos plugin

Save the changes & publish module.

Colors and color scheme

$
0
0

The color is an emotional language, people take advantage of color terms to strengthen their messages and convey emotions in natural interactions. For example: we use warm colors to maximize emphasis.

TIP: Finding a complementary color scheme to work with the photos is a simple way to make the perfect layout.

In color theory, a color scheme is the choice of colors used in design for a range of media. A color scheme is based on analogous colors. As a web designer, color management should be an inportant part of your workflow.

You can modify any of gavick template color scheme. Say, for example, you frequently use the same design template and you want to make it look a little different by changing the accent color or the background color using CSS. Those above tools should help you decide which color to choose:

Make color schemes from image.
Go there: http://www.degraeve.com/color-palette/  and enter the URL of an image to get a color palette that matches the image. This is useful for coming up with a website color scheme that matches a stock photo or logo a client wants to work with. Useful also for quickly grabbing a particular color for inspiration.

How to add a new module position ?

$
0
0

The first step in adding a new module position to your active template is to edit the templateDetails.xml file. This is located under the template folder. Once opened for code editing, locate the <postions></positions> tags. Existing positions will appear similar to the following:

The new position must be added between <position></postion> tags as they are for the other module positions.

Second step, Add the new module position to the template module styles by editing the gk.const.php file located in /lib/framework.

Open the .php file and add your new module to the array (see example below). The style for the module may also be set here. In this example it is ‘none’, but it may be something else, such as ‘gk_style’.

A new module position has now been established and it may be selected from module positions in the Joomla admin panel. Lastly, the module must be added to the template.

Last, very important, step. All template files are located in the layouts folder (gk_NameOfTemplate\layouts\default.php). Default.php is the default template view, and it contains code blocks located in layouts/blocks. The module may be added directly into the default.php file or to one of these blocks.

You have to know a little HTML and default template module positions to know where exactly add new module position. See my example, where I showed where to add new module below position “top1″ but above “top2″, so between them. Remember about <div> ..</div>and <section>..</section> if they appears in template code.

add-code-here

By the way, using firebug tool (add-on for firefox or chrome browser) should help you understand the structure of each template.

To insert your own (new) module paste the following code:

<?php if($this->modules(‘myposition’)) : ?>
<div class=”newstyle”>
<jdoc:include type=”modules” name=”myposition” style=”<?php echo $this->module_styles['myposition']; ?>” />
</div>
<?php endif; ?>

To make the module match the look of the template, you may need to adjust the CSS files, like following (it will add red thin border).

.newstyle {  outline:1px solid red;  min-height:5px; }

How to add full page image background ?

$
0
0

Since last few years there was a few solutions, some of them using javascript and some not have to. In modern times/browsers I suggest to use CSS3 background-size property feature. This method is cross-browser compatible and doesn’t require any jQuery or flash.

html {
background: url(images/background.jpg) no-repeat center center fixed;
-webkit-background-size: cover;
-moz-background-size: cover;
-o-background-size: cover;
background-size: cover;
}

The cover value specifies that the background image should be sized so that it is as small as possible while ensuring that both dimensions are greater than or equal to the corresponding size of the container. Scale background such that both it’s width & height can completely cover the background positioning area. Unfortunately, Internet Explorer doesn’t recognize background-size property below version 9. You can also use “contain” to scale the image, while preserving it’s intrinsic aspect ratio (if any), to the largest size such that both its width and its height can fit inside the background positioning area.

bg_size

Additional more info links:

How to make a animated favicon ?

$
0
0

As a preliminary point should explain what is favicon? It is the little square icon (16×16 pixels) that shows in your browser address bar, browser tab. It also is used when sombody bookmark a page. A good favicon should original and, if it possible, fits to the logotype and color schemes used in the Joomla or WordPress template.

Images for favicons should be 16×16 pixels. You can either resize an existing logo  or cut out the most important piece from it for use as a favicon. When resizing a larger image to be this small, you’ll often lose important details. That’s why you have to fix it using graphic tool.

Deafult favicons must use the icon (.ico) file format. But we need create also an animated gif icon. Create small animation (16 x 16 pixels) from images using online tool like: http://imgflip.com/gifgenerator or  http://gifmaker.me

icon-gif-animation-create

Then use [Create Now] button and save generated file favicon, remember to rename it. Now you can add this lines to header of your template (gk_TemplateName\layouts\default.php) in <head>…</head> section.

<link rel="shortcut icon" href="favicon.ico" />
<link rel="shortcut icon" href="favicon.gif" />

If you only want one favicon for your entire domain, simply save the favicon.ico  and favicon.gif file to the root folder of your site. Have fun!


How to align the button cart in Virtuemart product view ?

$
0
0

If you have enough of dancing the “add to cart” in Virtuemart category layout view – try some effective solutions to make a horizontal align constant.
add-to-cart
(1) You have to always add product title longer then one line.
(2) Or you’ve to use CSS to make title block height always this same.

h3.catProductTitle { height: 40px; overflow:hidden }


FEST: How to change a header section?

$
0
0

GK Fest template (Joomla 2.5/Joomla 3.1) has been prepared primarily for websites for cultural events. Header section has been made using only styled text with nice guitar image, which can be replaced easily.

fest-header

All text content is stored inside one Custom HTML module placed in “header” position, named also “header”. But to change it you have to disable WYSIWYG editor for a while, because sometimes it could delete/clean some our source code.

  1. get-ticketGo to User Manager and click on your account name, change your editor to “Code Mirror” or “No editor” and use Save button to apply changes.
  2. Now you can go to : Module Manager -> find there a “Header” module and open it.
  3. There you’ll all HTML code also for button label, event start and end date.

Guitar image (PNG 24-bit image with transparency to get better results) you should find here: templates/gk_fest/images/guitar.png

To show guitar image as background we used CSS:

.gk-animation .gk-guitar {
	background: transparent url('../images/guitar.png') no-repeat 0 0;
	height: 419px;
	position: absolute;
	right: 0;
	text-indent: -9999px;
	top: 30px;
	width: 187px;
	z-index: 2;
}

So if you want to change it to other picture you can simply replace PNG image (guitar.png) with yours (you can use this same filename) and override CSS to set right dimensions if it proves necessary.

Gray Map image in module background -> this file you’ll find also in template folder, here: templates/gk_fest/images/map.png

If you, but accident, deleted or broke original HTML code from module – don’t panic, here it’s (from J2.5 version):
<div class="gk-animation" data-height="530">
<div class="gk-animation-wrap">
<div class="gka-bg">Background</div>
<h2 class="gk-scale-up" data-start="{opacity:0}" data-end="{opacity:1}" data-delay="200" data-time="500">Festival 21 Feb. - 27 Feb. 2012</h2>
<h1 class="gk-scale-up" data-start="{opacity:0}" data-end="{opacity:1}" data-delay="600" data-time="500">Festival Musico</h1>
<div class="gk-stars" data-start="{opacity:0}" data-end="{opacity:1}" data-delay="1000" data-time="500">* * * * * *</div>
<div class="gk-jscounter gk-scale-up" data-dateend="21-2-2015" data-timeend="19:42" data-timezone="+2" data-start="{opacity:0}" data-end="{opacity:1}" data-delay="900" data-time="500">Counting finished!</div>
<div class="gk-guitar" data-start="{opacity: 0, right: '-200px'}" data-end="{opacity: 1, right: 0}" data-delay="900" data-time="450">Guitar</div>
<a href="#" class="gk-ticket" data-start="{opacity:0, top: '45px'}" data-end="{opacity:1, top: 0}" data-delay="1300" data-time="450">
<strong>Get a ticket</strong>
<small>Authentic Tickets on Time or Your Money Back!</small>
</a>
</div>
</div>

How to add & change Social Icons

$
0
0

Social Media Bookmark Icons help visitors bookmark their favorite posts and articles in any social media platform such as Facebook, Twitter, Pinterest, Google+ and others, ensuring that they can get back to your site directly for future reference. Using these resources gives the opportunities to get Joomla! page visible on the web and ways to get links back to your website.

We know that users can promote content by sharing to over 330 of the most popular social networking and bookmarking sites. Actually, social media icons are links which are illustrated with logos of social networks. However, it is not possible to show all icons on the same Joomla template, so generally we choose a few most popular, which, you can change it using few lines of CSS and sometimes graphic tool.

GK Creativity Social Media Icons

GK Creativity Social Media Icons (at the bottom in Contact section)

gk_magazine_social_icons

GK Magazine Media Social Icons (on the left vertical side)

NEWS Media Social Icons

GK News Media Social Icons

When it comes to social engagement you should understand subject areas of every single social network which you want to use. For sure, entertainment social media icons (for example Pin It button) don’t fit to business websites.

Social Icons technique in Gavick Templates

  • GK Creativity – in this modern template we used simple HTML, CSS3 content property used with the :before  pseudo-elements to show content (social icon) in an element  and Font Awesome (font vector icons) as a social icons. One reason why We decided to use it was because We wanted to cut down on the amount of images the page was loading.
  • GK Magazine – we used CSS Image Sprites technique – An image sprite is a collection of images put into a single image. So if you want to add new or replace icon you need to use graphic tool. All social icons are stored in this file: templates/gk_magazine/images/style1/icons.png (or style2 folder).
    Read more here:  css-tricks.com/css-sprites/

    gk magazine social

    Note: Original image file has vertical orientation

  • GK News – also here we used CSS Image Sprites technique. All social icons are stored in this file: templates/gk_news/images/style1/social_icons.png   (or style2 folder).
    gk_news--icons

As you can see both templates GK Magazine and GK News uses this same technique That’s why why you can use same method. So if you want to add a new social button, you have to use graphic tool. You can replace our icon with yours (this should be easy if you know basic of image editing) or you can add a new one after g+ icon. If you’ll choose second solution you have also find nice icon (for example on iconfinder.com) then add at the end, with little before space. Now you have to calculate how much you have to add to negative background position. Let’s try to add youtube icon:

(1) Add new HTML line with “gkYouTube” class inside CUSTOM HTML module:

yt-social

(2) Use graphoc tool (also can be online) and add new icon 22×22 px (with two color options).

social_icons_after2

(3) Add new line of css code (info how to), remember to add full URL to image (social_icons.png) to be sure that link will works.

.gkYouTube {
background: url("FULL URL social_icons.png") no-repeat scroll -115px 0 transparent;
    display: block;
    float: left;
    height: 22px;
    line-height: 22px;
    padding: 0;
    text-indent: -9999px;
    transition: background 0.3s cubic-bezier(0.2, 0.7, 0.9, 1) 0s, color 0.2s linear 0s;
    width: 28px;
}

.gkYouTube:active,
.gkYouTube:focus,
.gkYouTube:hover {
background: transparent url('FULL URL social_icons.png') no-repeat -110px -22px;
}

Result (after mouse hover on YT icon)

social_icons_after3

Less Icons is better

We suggest: Don’t use too many social media sharing buttons on one page. Nobody will share your post via all of his/her social media accounts. An average user doesn’t even know for what those icons are used for. Instead select the popular ones in your country or select the ones that  are most  related to the topic of website. Read about the Paradox of Choice if you don’t believe us.

Social Media Icons – too many?

Social Media Icons – too many?

The more buttons you paste on template, the more KB need to be load and the higher website loading time is. Site visitors and Google like fast websites, so you shouldn’t disappoint them.

Alternatives

Sometimes if you don’t have a patient to make changes by your own, you can also use ready social modules like our Social GK5 or use code from AddThis.com instead. Also on JED there are some others modules which allow to choose small or big, colorful or monochrome social icons.

How to Add or Use Custom CSS in Template ?

$
0
0

Yes, you can customize Gavick Templates. There are few methods will allow you customize appearance of selected elements (like Header font size/color) or even the entire layout you are using.

First, you don’t have to edit the template.css or any other of the parent template (Gavern framework). The reason being that if you edit the framework files then when you update the template you will loose all of your code. Because all of your changes will then be overwritten by new version.

Second, our Gavern Framework (for Joomla 2.5 and Joomla 3.1) have options that will allows you use custom CSS code to override the default code. CSS (Cascading Style Sheets) is a kind of code that tells the browser how to render a web page appearance.
Go to Template Manager -> click on selected GK Template Name -> then choose Advanced settings tab.

custom_css_code

In Joomla 2.5 (Gavern Framework)

In Joomla 3.1

In Joomla 3.1 (Gavern Framework)

As you see on above screenshot Framework (Template) offers you:

  • CSS Overwrite – which allows you to enable & use additional CSS file with override rules – override.css. Placed here: templates\gk_TemplateName\css\override.css. When editing your CSS via CSS Editor, it is a very good idea to always preview your changes before actually applying them – regardless of your skill level.
  • Under Custom CSS code is the field where you should enter/paste any custom CC you want to use on the page/element. You type it in just like you would in a .css file. Remember to Save your changes.

Which option is better and when to use it?
If you need few small changes in stylesheets use Custom CSS code field. If you need more changes more then 10 lines of code use override.css file.

How to find which line I have to change/override?
Be sure to use the proper format and refer to existing selectors and classes.  Firebug tool will help you inspecting HTML elements and  CSS properties (see on youtube how it works). If you try to set a style rule for something that doesn’t exist in the template’s style, you will not see any changes.

How it works?
The reason we are able to add our own CSS and have it override the actual template’s CSS is because of one of the key factors of Cascading Style Sheets–the cascade. Your user inputed styles will take precedence over the template’s default styles. The styles you enter will be appended at the end. That’s why this will override any existing CSS properties that have been defined by the default stylesheet. This will also allow you to style elements that aren’t specifically styled by the template’s CSS.

How to change space, colors, font size ?

$
0
0

Some changes can be made via template configuration (info) but some not. So you probably ask: How to change space between elements (paddings & margins), font size or capitalization of article titles in GK template(s) – those are a common questions during template customization, sometimes asked by your client. To answer  them, you have to do tree steps: (1) check, (2) test and (3) implement changes.

We suggest to use: Firebug for Firefox or Firebug Lite for Google Chrome. Instead of having to make a CSS change, reload, make a change, reload you can just edit it live to see the results.

Installing Firebug in Firefox

In Mozilla FireFox, go to the Tools menu, select “Add Ons” and under “Get Add Ons” type Firebug in the search box. Click the Install button. You may need to restart Firefox after installation.

(1) Use firebug to check, click on inspect icon. With HTML tab you can look at your CSS rules and see which ones of them are actually used on your website and which aren’t. Once you select the element, look in the bottom right hand corner of your firebug window. Here you will see the CSS elements and attributes of those elements that relate to the object you selected in the web site. To the right of each element you will see the Location of the CSS element in the document as well as the line it appears on.

(2) Test your modification using firebug live editing CSS properties. For example, here’s how we can see the effect of changing article appearance in GK Rockwall template (space, color, uppercase).

rockwall-before

Before (default view)

Right-click on this section of the web page and choose “Inspect element”. Firebug will immediately highlight this section in the bottom panel. Let’s start from changing space between Category & Date section and title for K2 items.

Space between category/date and title

Space between category/date and title

As you see this section is located in article header inside <ul> and we used margin: 0 0 32px; What is mean that bottom margin has default value 32px.

Move your mouse over the value of the margin property, and change from 32px to 5px. Notice when you change the value,  the changes are applied immediately. This step allows you reduce space, however only temporarily. Rewrite or copy the new code:

article header ul { margin:0 0 5px; }

Now let’s reduce title font size, click on the <h2> tag on the right firebug panel.

How to change article title font size

How to change article title font size

You have change font-size and line-height default values, for example from 44px to 32px, and 52px to 42px. So your new code should look like this:

#k2Container article header h2 {
    font-size: 32px;
    line-height: 42px;
}

Note: You don’t have to use property which you don’t change.

You can also change text-transform from “uppercase” to  “none”.

#k2Container article header h2 {
    font-size: 32px;
    line-height: 42px;
    text-transform: none;
}

Because title is also a link, if you want to change its color you have to click on <a href=” under  <h2> :

rockwall-titles2

You have to change hex color for font, from default #222222 (dark gray) value to any other. For example:

#gkMainbody article a:active, #gkMainbody article a:focus, 
#gkMainbody article a:hover, #gkMainbody article header a {
    color: blue; }

But if you want to use different color for hover effect you have to modify a little bit:

#gkMainbody article a:active, #gkMainbody article a:focus,  
#gkMainbody article header a { color: blue; }
#gkMainbody article a:hover  { color: green; }
rockwall-after

Result after all above CSS changes

Read article also about colors here.

I don’t need this element

screenCSS-disabling

Often, the solution to a problem can be found just by disabling a few CSS properties and seeing what the world looks like without them. As you mouse over each property, you’ll see a little circular icon on the left. Clicking that will disable the property, and clicking it again will turn it back on.

(3) Implement changes using override  technique.

Thus the editing in Firebug is live, you’re not editing source code. Since Firebug does not save changes to your template, you will need to copy the changes you’ve made in Firebug and paste them into (three options):

  • Custom CSS field  (template configuration).
  • Your template’s css\override.css file.
  • Firebug will also tell you exact line number where certain elements appear in the template.css, joomla.css, k2.css or style1.css file. So you can change also there. But this is not a suggested solution!

For more details about CSS customization –> Read this article .

How to change or add background color & image

$
0
0

Color and background images is useful for both the design and the organization of a Web page. Gavick templates allows you to modify almost all aspects of visualization, for example background customization – change of selected element or all page background image/color. Note that some color settings can be made via Template configuration but others, more advanced, requires code modifications or overrides technique. To create flexible, modern solutions to design problems, we must figure out how we can get by using CSS3 reducing number of graphics.

  • First, you have to prepare image and hex color code or gradient code.
  • Second, you need Firebug tool installed in your browser to check which Class or ID you need to override to make final changes.
  • Third, you need to learn some basic of CSS and CSS3.

The CSS background properties

  • The background-color property allows you to set a background color.
  • The background-image property is used to specify a background image.
  • The background-image: -webkit-gradient is used to create a color gradient.
  • The background-repeat property allows you to control background tiling, you can choose from: repeat | repeat-x | repeat-y | no-repeat.
  • The background-position property is used to control how the background is positioned.
  • We use background-attachment property to control whether the background scrolls with the page or remains fixed in place. By default, the background image scrolls with the content of the web page. If the “fixed” keyword is provided the background image remains fixed in place while the page scrolls.
  • The background size property allows you to sets the width and height of the image within the element’s background as an absolute length, percentage, or the keywords cover, contain (both make the browser scale the image proportionally) or it can be auto.

The background color

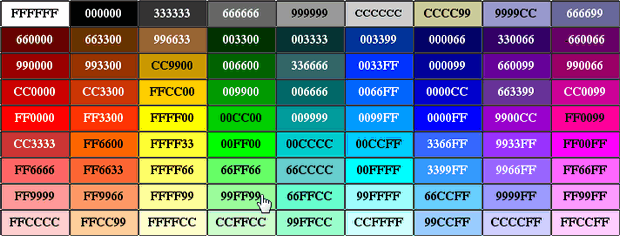
The background-color property is used to specify a solid background color and accepts the same color values as the foreground color property. So it can be a color keyword, like blue, an RGB value like rgb(34, 121, 160), a hexadecimal color value such as #2279A0, or a short hexadecimal color like #ccc.

body { background-color: #003399;}
or
body { background: #333;}

colors-table

By default, backgrounds are transparent, so the parent element’s background will show through unless the background color or image for that particular child element is set. You can give a background color to almost any element — from <p>, <h1>, <ul> elements all the way up to the entire body element, like in following example.

To change background color of menu you have to override only one...

To change background color of menu you have to override only one line from class

To change this element background color we use:

.gkMenu > ul  { background-color: #808080; }

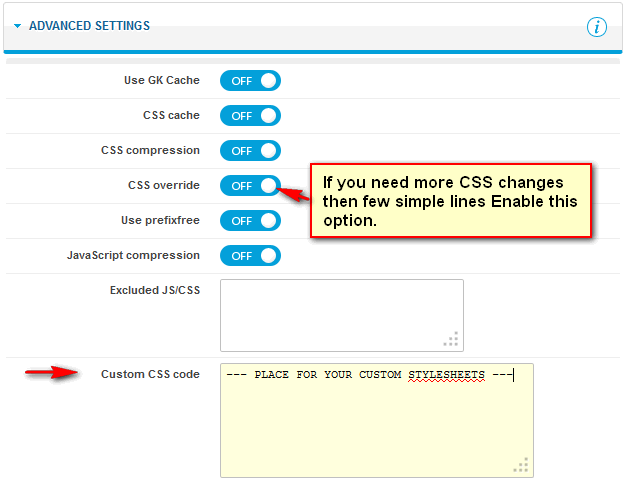
In template configuration –> Advanced settings (tab) -> Custom CSS code field:

custom-css-code-background

IMPORTANT: Of course this was only example how to change menu background  color that works only when your GK template uses that class – if you want to change different element background  use firebug to localize corresponding class or ID.

CSS TIP: Unlike the color property, background colors are applied only to the element, and are not directly inherited by its children.

Note: The background generally should provide the most contrast with the foreground text colors.

The background image

The background-image property enables you to provide an image (JPG, PNG or animated GIF) for the background, one or more background images for an element. Before CSS3, only one background image per box was allowed. The value for background-image should be either an absolute (complete Web address with http://) or relative path to one or more images, each wrapped with url(“”) and delimited with commas.

For example, you can create a background out of a small, repeating texture – after using the repeat value of the background property.

body {background: #ccc url("images/joomla_green.gif") repeat-x;}

or use:

.gkMenu > ul {
  background: #674817 url('templates/gk_gamenews/images/bg3.jpg');
}

If you’re using GK GameNews and you want to change menu background.

desk-gn

That is similar to the way that the background property can be followed by multiple values. Using this shorthand property, you can set the color of the background (the background-color), and supply the URI of an image to be used on the background at the same time.

Note that by default, a background-image is repeated along both vertical and horizontal axes, and is repeated in both directions. So it covers the entire element.

For example, the value “none” ensures that no background-image will be displayed; this is the default setting, so you don’t need to define it explicitly unless you want to override previous background-image declarations.

div.example {background-image:none;}

BACKGROUND TIP: How to add full page background

CSS Gradient Background

One of the features is the ability to specify gradients using pure CSS3, without having to create any images and use them as repeating backgrounds for gradient effects. CSS gradients are scalable !

We will show you how to use CSS gradients for some major browsers: Firefox, Safari, Chrome and also IE. Which means that you can add linear and radial gradients compatible with modern browsers. Although almost all  browsers can display gradients, the syntax has not been standardized by the W3C, so all have a unique way to define the style.

If you need nice gradient you don’t have to use images – gradients are implemented within the background-image property. We recommend using a online tool(s)  that computes the CSS code for you:

  • http://gradients.glrzad.com/
  • http://www.colorzilla.com/gradient-editor/
  • http://ie.microsoft.com/testdrive/graphics/cssgradientbackgroundmaker/
  • http://www.cssmatic.com/gradient-generator

Those tools adds appropriate vendor prefixes to the code that enables web browsers to display gradients suitably.

Finally, the result panel always has the CSS for the current gradient for easy copying and pasting into your custom CSS field or stylesheet (gk_TemplateName\css\override.css) file.

gradient-custom

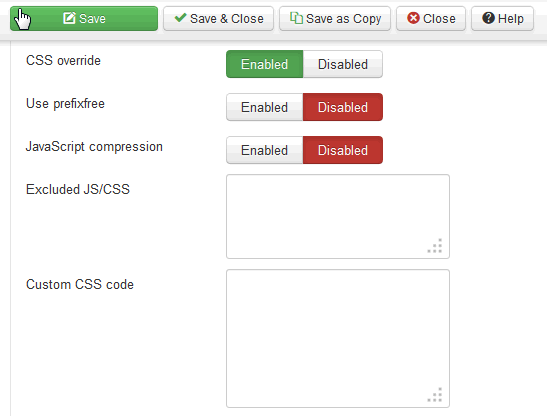
Custom CSS code in GK Template configuration

CSS3 Gradient Menu (without images)

CSS3 Gradient Menu (without images)

TIP: If you need to add new background (color/image) or change its color use Custom CSS

How to use custom code (JavaScript/CSS/PHP) on selected pages

$
0
0

If you want to insert custom code: JavaScript, PHP, HTML or CSS code (including banners or text ads like Google Adsense) in Modules or directly in the template (header/body) you have to use additional extension(s) for Joomla 2.5 or Joomla 3. Some of them can also displays random HTML-code in the content of your website.

Note: All those tools eliminates the hassles of manually inserting such code directly into your templates php/css files. Most of them are free to download (GPL) and they are available directly from JED.

Custom Code Plug-ins

  • Sourcerer – enables you to place PHP and any kind of HTML style code (including CSS and JavaScript) right in to your content! Not only in your articles, but also in sections, categories, modules, components, META tags, etc.
  • EXT Custom JS/CSS – this system plugin performs one simple function: It inserts custom javascript or CSS code in the head section of your Joomla all pages.   This extension have only two fields to insert your code.
  • JT Custom HTML code – a plugin that allows direct embedding of  HTML tags right inside Joomla content page! You can exclude article and categories, for example, if you use single article on homepage you can use it.
  • JT Random HTML code – this plugin displays random HTML-code in the articles of your website. It allows you to use 10 fields for random HTML code and select from few options. This same developer created also module which allows you this same but inside module block.
    options-random-html

Custom Code Modules

Modules gives you more flexibility because they allows you to choose pages where & when custom code must be inserted.

  • BlankModule – this module has a text area on the backend for accepting code. This means that you can cut and paste code such as potential advertisers or Google may supply you with. You can also access Joomla article content and insert it into module positions. It also has a mode that accepts PHP code directly. It allows you to insert Scripts and Head Tags on assigned menu items.
    blankmodule
  • Compago Blank Module – have similar features like above module.
    compago-blankmodule_settings
  • Custom HTML Advanced  – compared to standard mod_custom it has the following features: No filtering (even for script tags), override module position chrome to remove unwanted wrapping HTML code around the module. Can also include CSS definitions that will be placed into page header only on the pages the module is present. Allows doing template CSS overrides on selected pages.
    custom-html-adv-settings

Custom CSS Class on Selected Page(s)

On Menu Manager in Edit Menu Item you will find Page Class options – which allows CSS styling specific to selected(this) page. Remember to add space before class name.

page-class-css

page-class-result

This solution will be good enough when you want to add & use additional class inside article or component.

TIP: Read article about how to use custom CSS in template for all pages

Note: Since none of these extensions does not belong to us (gavick team) if you have any questions, please contact the developer of plug-in or module.


How to add print and email icons instead of text links

$
0
0

We all know that sometimes your clients expect typical icons instead of “modern” text links for print and email icons in article views like it was in the default joomla templates – that’s why we’ve prepared this short but useful guide.

icons-print-email-joomla

Before customization

First of all, you have to modify our override file in the GK template:

 templates\gk_TemplateName\html\com_content\article\default.php

You can use one of the following techniques for replacing our code to use custom icons:

  • using HTML img tag
  • or using J! code.

Both are simple, and the second one just needs a simple copy & paste from the following code.

For a PRINT icon, please find in the source code file:

<?php echo preg_replace('@<img.*?alt="(.*?)".*?\/>@mis', '$1',JHtml::_('icon.print_popup',  $this->item, $params)); ?>,

and replace it with:

<?php echo JHtml::_('icon.print_popup',  $this->item, $params); ?>

For an E-MAIL icon, please find:

<?php echo preg_replace('@<img.*?alt="(.*?)".*?\/>@mis', '$1',JHtml::_('icon.email',  $this->item, $params)); ?>

and replace it with

<?php echo JHtml::_('icon.email',  $this->item, $params); ?>

Now upload the changed file to your template folder on your server.

Default icons for print & email - after customization

Default icons for print & email – after customization

Those icons are also from the template folder, so you can upload/replace with your own PNG icons (16 x 16 pixels).

  •  templates/gk_TemplateName/images/system/printButton.png
  • templates/gk_TemplateName/images/system/emailButton.png

How to use different background images on different pages

$
0
0

Joomla’s templates generally have the same background style (image/color) for each and every page. By applying additional extensions to a specific page (various menu item) the background can be styled individually from the others, increasing the variety of your design without resorting to using multiple template styles.

There are few ways to add and use different background images (or/and colors) on different pages in Joomla.

First method, in the Features tab of the template settings you have an option, “Suffixes for pages” – where you can define a unique suffix (a CSS class) which will be added to the body tag on the specific page (you have to specify the menu item ID for the CSS class or component name – then the suffix will be used on all pages of the specific component).

suffixes-for-pages

So if you specify a suffix “ABC” (or “frontpage” as we did in our example) for the homepage (usually menu item ID = 640) then it will be appear in the body tag as:

   <body class="ABC">

body-class

and then you can specify a background for the homepage only using the following selector:

body.ABC { background: #FFFFE0 url('test.jpg');  }

Where you can add CSS tags responsible for background color and/or image. You can read here how to use custom CSS in Gavick templates.

Second method is based on using a background module. On JED you should find few solutions which should help you with this task. I mentioned a few of them above. When doing this remember about module assignment. Using modules, you have more flexibility, because you could have different bg images for logged in/anonymous users.

  • HD-Background Selector (www.hyde-design.co.uk) this is a simple module that allows you to apply a different background style to individual pages on your Joomla website. You can select background colors, images or repeated patterns. This module replaces the default style applied to the body tag and in some cases the templates conceal the body tag using some other elements, in such cases you need to change the element ID to the correct one to overcome this problem. This extension works normally at any module position that is specified.
    HD-Background-Selector--joomla-1

    Basic Options

    HD-Background-Selector--joomla-2

    Advanced Options – allows you to use multiple backgrounds in Joomla

  • bgMax (lomart.fr) – this French and free module (for both Joomla 2.5 & Joomla 3) comes with a range of options for simplifying the management of your images in the background of your site. It’s totally independent of the template or framework, it just adds code to customize your page by the template after its generation. This module must be activated in ‘DEBUG’ position or any other that allows you to insert the code in footer.

    bgMax_1_changing_background_image_template

    Advanced Options – allows you to choose background color, opacity etc.

  • Also, a very simple background module (www.joomla4more.com) enables you to configure a static or random background image on your Joomla 3.2 website. You can choose background color, images directory and add additional CSS styles if need them etc…
    joomla_background_changer
  • Check is also a feature of HD-Custom CSS – which can also help you.
  • A few weeks ago I also recommended  mmBackground in another topic – which came with a range of options for how to display your images in the background of your site. But the developer has temporarily(?) shutdown the project website.

How to use a background module on selected pages

When using these modules note that you have to assign the chosen module to a page (menu item) where you want to change, more precisely “override”, the default background image.

menu_assignment_joomla_32

Use Module Assignment tab in module configuration than choice of module assignment

Because in this CMS it’s possible to have different modules (and module copies) appear when you click different menu links.

Read also our other tips about background customization.

How to create a Sticky Footer

$
0
0

If you asked us how to create a footer that sticks to the bottom of the page in a Joomla template or WordPress theme we would say to you: “It’s pretty simple“.

Our objective is simple: Make the footer of our web page stay at the bottom even if the page’s content area is shorter than the user’s browser window. Probably you need this solution because in the footer section you have copyrights, footer links and sometimes bottom navigation.

On the web you can find a few different techniques to do this job, which is the best? – It’s hard to say.

1) First step, find & define which element of the layout must be sticky – for this you can use the Firebug tool.

2) For example, in GK Creativity

#gkFooter {
bottom: 0;
position: fixed;
width: 100%;
}

Additionally to reduce footer height you can use this css code:

#gkFooter, 
#gkFooterNav li {line-height:50px;}

Unfortunately, a sticky footer is not really suited for responsive web design layouts if somebody will use a smartphone to browse website,  because it covers a large part of the available mobile screen. For RWD, that just doesn’t work, as the footer needs to be able to change size along with the screen.

….

How to add icons to menu items

$
0
0

One of the fundamental things in Joomla web design in reference to usability is navigation. By default our templates’ use of colors, highlights and mouse-over effects simplifies detection of the items that are being searched by the user.

The use of icons beside menu items is a useful alternative that favors a quick visual option identification; and even the use of icons without accompanying text is viable. Icons on the menu – it’s not a new idea; this approach has been used on websites for several years. In particular, it may be useful to eliminate ‘Home’ or ‘Start’ buttons.

What is interesting is that it is very easy to do using the following solution both in Joomla 2.5 and Joomla 3.2. If you want to add icons (PNG/GIF) to your menu, you first have to upload your icons to the your_site_root/images folder. Please note that the icons should not exceed 16 x 16 pixels; it must be that resolution if you want to avoid menu layout breaks. Advanced users can use bigger icons by customizing menu style classes.

#1: How to add icons to a menu using Menu Manager

If you’d like to display icons for drop-down menu items; from the administration option of your website, navigate to Menus –> Main Menu.  In the next step, click on any menu item to add a suitable icon for it.

On the right-hand side you will find a list of parameter categories, e.g. Page Display Options, Link Type Options. Depending on the Menu Item Type there will be a parameter called Link Image in one of these parameter categories i.e. if your Menu Item Type is an External Link, you will find the Link Image parameter in Link Type Options.

menu-icons-joomla-25

Use the “Select” button to choose images (icons) from your /image folder.

menu-icons-joomla-step2

 Now click the Save button to apply these changes.icon-in-menu

#2: How to add graphic icons to a menu using CSS

The second method is based on css class (with image) for selected menu items. To use this method you have to know the ID of each menu item position where you want to add an icon. In the Menu Manager in  the last column you should see all menu item ID’s.

menu-id-joomla-3

Now you have checked the Menu item ID you are ready to add an icon for this item only or multiple items if you need more icons. In my example I will show you how to add an icon for “Template” with ID 102, so I have to use the following code:

#gkMainMenu .gkMenu > ul > li > a#menu102 
{background: url('link-to-image') no-repeat left;
padding-left:24px; }

menu-icon-by-css

Tiphow to use custom CSS in Gavick templates.

My example result (“pen” icon near TEMPLATE label)

result-with-icon-in-joomla-menu

#3: How to add Font Awesome vector icons in a menu using CSS

To use this method please start reading from the beginning of method #2, but skip the section about inserting graphic icons. Let’s do a small modification in only one file /css/font-awesome.css  – from your template folder. In line ~37 after the comma please add your ID, like so:

[class^="icon-"],
[class*=" icon-"], #menu102 {
  font-family: FontAwesome;
  font-weight: normal;
  font-style: normal;
  text-decoration: inherit;
  -webkit-font-smoothing: antialiased;
  *margin-right: .3em;
}

Now find the icon name that suits your needs, for example “magic”, and add after the comma your menu ID with a “:before” tag.

.icon-magic:before, #menu102:before {
  content: "\f0d0";
}

Upload or save changed file – that’s all that’s required. Refresh your page, after few seconds you should see an icon from Font Awesome near your menu item.

font-awesome-in-menu

MENU WITHOUT LABELS

If you want to create Menu items without labels you have to use a different technique – because in quickstart we have used the GK Menu Extended Parameters plugin (plg_gkextmenu). To disable menu item names you have to hide them, especially if you don’t want to hack the template core file.

First, you have to know the ID of each menu item position you want to modify. In Menu Manager in the last column you will see all  the menu items ID’s.
Second, use this simple code as an example:

a#menu102 { font-size: 0; line-height: 62px; }

This code allows you to hide labels from users and centers the menu icon to the middle.

menu-no-labels

You  probably don’t have to worry about SEO/UX if you only use this method for one item.

How to change icons in modules

$
0
0

In all new templates like: CloudHost Bluap and (M) Social we didn’t use typical, standard image icons – probably that’s why you couldn’t find any images, because those icons are fonts (scalable vector icons). Yes, we used Font Awesome  – that’s why:

  • You can add & use basic icons from a free collection of over 300 font icons.
  • By using Font Awesome icons are limited only by the dimensions of their documents – and they can scale without losing definition. You can look upon scalable icons in the same way as scalable font characters.
  • You can change their color and easily add shadows and change their transparency. In fact you can do anything with them that you can with fonts.
  • They are fully compatible with Bootstrap.
  • Font Awesome icons are vectors, which mean they’re gorgeous on high-resolution displays (iPad with Retina screen).

Check where we used Font Awesome

bluap--joomla--icons

cloudhost-icons


How to use Awesome Font shortcode (Font Awesome v3.2.x only)

Shortcode  will generally work only for articles and module content in the editor screen. Use this shortcode:

laptop

where you want the laptop icon.

icons---font

In this example I have changed two fonts icons from “laptop” & “signal” to “camera-retro” and “dashboard”.

new-icons

List of all icons fonts which are used in template you can always check here:

  •  http://fontawesome.io/3.2.1/
  • and in template file here: gk_TemplateName/css/font-awesome.css.

Note: Since Font Awesome 4.0 was released few days ago (October 23), we’ve learned that some things have changed. Version 4.0 have a new prefix class and some icons have been renamed. So please be patient before we include those changes in next framework updates. However, the Font Awesome v3.2.1 will stay in our “old” templates untouched.

For more details check the project website: http://fortawesome.github.io/Font-Awesome/


Viewing all 41 articles
Browse latest View live